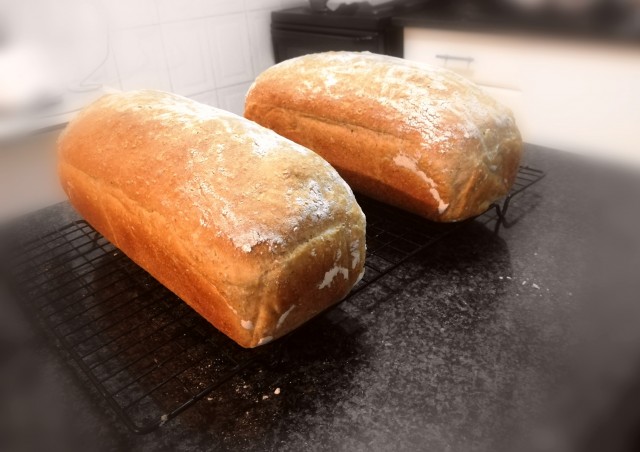
Everyday Bread
Mrs Ally
Master Chef142
725.4K
569
Building our digital recipe book.
Joined 2 years ago
14 favourites
3 comments
5K views
INGREDIENTS
Yields 1 large loaf.
380g room temperature water7g salt (We use fine Himalayan)10g sugar10g oil1 teaspoon good quality yeast (purple packet Anchor is the best, only one that is consistently reliable)
100g brown bread flour400g white bread flour/ cake flour
METHOD
Important!Make sure you are using good yeast. If it is dead, the bread will be horribly dense. We can't stress this enough! Most bread fails are simply down to inactive yeast. After opening and using the sachet, peg it tightly and store in the fridge.
DoughAdd ingredients into a large bowl in the order listed. Mix lightly with a large spoon.
Cover and set aside for just 15 minutes.
Now give it a good mix in the bowl for a few minutes until it binds into a rough ball of dough. Don't add flour! Cover bowl well with a piece of Clingwrap.
Leave it to rise in a cool place for 6 hours until the dough is about tripled in size and full of gas.In summer, you need to do this in the fridge. In winter, it can take up to 8 hours to proof.
During this time, give the dough a 'stretch & fold' . That just means stretching the dough out from under itself and gently folding it over itself. Rotate the bowl and repeat a few times until you have a neat ball of dough again. You can use your slightly wet hand or a silicone spatula. You can do this process once. We sometimes do it twice for extra strength.
ShapingPrepare a large loaf tin (called the 900g tin) by lining it with baking paper. Set aside.
Punch down dough and then turn out onto a lightly floured surface.
Now use your hands to press it down into the shape of a rough rectangle. Fold the edges into the middle then roll it up like a swissroll. You may use a light sprinkle of flour now to stop the dough from sticking to the counter. Make sure to pinch the seams tightly. Then place it carefully, seam-side down, into the prepared tin. Press down lightly to flatten it.
Now, dust lightly with flour then place a piece of plastic loosely over.
Allow to rise until the top of the bread reaches the lip of the pan. This could take anywhere from 30 minutes to 2 hours.
Now remove the plastic, give the bread a good dusting with flour again.Cover carefully and refrigerate until ready to bake (between 5-8 hours).
>Note: If your fridge is not set on the coldest setting, or you are expecting load shedding, then be careful as the loaf will still continue rising in the fridge. This takes a bit of trial and error to get right. >If it so happens that you forgot about it and the loaf rose too much in the tin, bake it immediately. There's no good trying to refrigerate it.
Half an hour before you are ready to bake, preheat the oven to 190°c, fan assisted.
Remove bread from the refrigerator and take off the plastic in one quick, fluid motion. If it stuck to the bread, remember to put more flour next time.
Do the jiggle test:Lightly wobble the loaf tin. Does the bread-dome jiggle or is it firm? Or is it sunken?
1. If it has a light jiggle to it, this is the ultimate bread. It is full of gas and will be lovely and fluffly - very light. This is a perfectly proofed bread. 2. If it is firm, this is a slightly underproofed bread. You can go ahead and bake it, it will still be great as long as it has risen above the pan lip. To help this loaf, score it. You can Google that for exact instructions. 3. Unfortunately, if it has sunk then it overproofed and there is nothing to be done. Just get it in the oven as soon as possible! It happens to us every now and again. The bread will still be edible, just a bit coarse and slightly sour.
When oven is fully preheated, place bread inside and bake for 40-45 minutes or until well golden brown. You can tap it lightly and it should make a hollow knocking sound. It must not feel soft at all.
Take out of the tin carefully and place on cooling rack. Peel off the baking paper. Cool for at least 30-40 minutes.If you slice while it's too hot it will crumble and appear gummy.
Enjoy sliced and smeared with fresh butter, honey and jam. Also makes delicious sandwiches when sliced thin! (Although for sandwiches we prefer our Sandwich bread, recipe in profile.) Toast it, if desired, on the second day. It also makes fantastic croutons- just remove crusts, drizzle with oil and sprinkle with herbs and pepper. Bake till crisp.
Our Winter Schedule:11am- make dough12.30pm- give a fold 6pm- shape dough and place into the fridge after 15 minutes 4.30am- start preheating oven5-5.45am- bake bread6.20am- serve
Even the worst bread fail can be saved by turning the loaf into breadcrumbs!
INFO & TIPS
>This recipe has been well tested! You can tinker with it until it suits your family's taste and schedule.
>Long rising times = the most delicious bread you have ever tasted!
Notes:
>Adjust the water amount in the main dough by adding/subtracting 15g until you are happy with the crumb of the baked bread.
Higher hydration means a looser bread with larger holes.
>Do not add any flour at all when kneading. You can use a silicone spatula to clean your hands and then wash it thereafter! It helps to dampen your hands when working with sticky dough.
>Brown flour is more nutritious and tastier than white but it produces a much denser loaf. You can use as much or as little as you prefer. The most well-rounded loaf in our experience is a 30% brown, 70% white.
Increase the hydration slightly (10-20g extra water) if you add more brown.
>We used to insist on white bread flour, but Snowflake's cake flour has a high enough protein content to make it passable instead.
POSTED ON
11 Dec 2023
ADVERTISEMENT
WOULD YOU LIKE TO ?
Mrs Ally
Master Chef142
725.4K
569
Building our digital recipe book.
Joined 2 years ago